Brushing teeth was a challenge with either of my kids when they were infants/ toddlers. And though we brushed at least twice a day, either of them ended up with a little cavity. And we don't eat much sugar, next to no candy, we drink no sodas, no formula, no junk food.
So, I started researching what can cause my little ones to develop cavities. And what might help us brush teeth naturally and without a fight. Then of course, it had to be reasonable in price.
And I found out that there are things that can no only clean your teeths, but even strengthen them and heal them - yes, not just prevent, but heal cavities!
To read more on this subject, go to curetoothdecay.com
This is what you need for your own healthy, sweet toothpaste, that is safe to swallow:
4 tbsp Calcium Bentonite clay (edible)
4 tbsp (or less) Stevia / Truvia (any baking aisle)
4 tbsp purified water
for older children optional 4 drops peppermint extract or peppermint essential oil.
Mix ingredients well, keep in airtight container.
!!Using glass or wood bowls and utensils (or even plastic) is preferred over metal as the clay is porous and will absorb any leached particles!!
Thursday, February 23, 2012
Tuesday, February 21, 2012
Make your own tooth powder
It's my goal to make all our toiletries myself. What I once thought impossible,
isn't that difficult at all! Over the past months I tried various recipes to make
my own toothpaste or tooth powder.
I first tried baking soda, then baking soda with sea salt and coconut oil - which I liked a lot, but hubby got headaches from too much salt (he has high blood pressure).
So, I searched for an alternative and found many recipes on powders with calcium bentonite clay - which was great, since I already used the clay to wash and condition my hair and to do face masks!
We have used this powder now for several weeks and it works great - only remember not to brush your gums excessively with it, you might get soar! It's sand or mud!
Other than that, it works really good!
You will need:
2tbsp Baking Soda
3 tsp Stevia (baking aisle at Walmart)
1/2 tsp Essential oils: tea tree oil, mint or peppermint or spearmint oil
3 tsp Ground cloves (HEB $3)
8tbsp Calcium bentonite clay (I use the edible one;
you can find a variety on ebay - I bought mine 1 lb for $8 plus s/h)

Mix the ingredients well. You might use it as is or add coconut oil to make a paste.
You can also just use it as an enhancer together with your regular toothpaste.

Make your own deodorant - cheap, easy and very effective
Hi, today I am going to share a recipe with you, that I have known for a long time, but kind of hesitated to try it. I finally did a few weeks ago and it works great! We are all so happy with the product, we don't want to go back to store bought deodorant!
There are very few deodorants, that can truly prevent odor for 24 or more hours - no matter the promises in advertisements! But this one definitely can!
The ingredients are cheap and it's easy to make - what more do you want?!
Try it yourself and stay fresh under your arms :)
What you need :
Coconut oil
Baking Soda
Corn Starch
Teatree oil or Lavender Oil (Essential Oil)
(you can get these for reasonable prices on ebay)

Mix 1/4 cup Baking Soda with
1/4 cup Corn Starch
add 1/2 teaspoon of EITHER (not both) oils

You can use the powder as it is now or
you can add the coconut oil (2tbsp) and make a thick paste.
If the coconut oil is too hard, put it a few seconds into the
microwave and it will get soft or liquid.

Use an old deodorant container and fill in the paste.

Works perfect! Better than any store bought deodorant!
Estimated cost of one deodorant stick $0.25 - $0.30!!

If you don't have an old deodorant container, or it is too warm
and the coconut oil seems to melt,
you can also just form a ball from the mass and then
flatten it a bit, wrap it into clear foil and store it in the fridge.
We did this the second time I made this and it works even better!!
It's very refreshing when you use it! Just unfold one side (edge)
of the "bar" and rub under your arms (one time from top to bottom is enough!).
Works great and doesn't stain!
Make a birds nest (for homeschooling?) - cheap, easy and delicious

My oldest son is now 4 years and I have been homeschooling him for several weeks now.
This is a great project we did when we talked about birds. That week we discovered everything about birds and their nests and he has so much much to make this nest ... and we all enjoyed eating it :)
You can also make a nest out of rice crispery and melted marshmallows, but I chose this recipe, because the ingredients are much healthier - and it really wasn't more work (and tasted a lot better!).
What you need:
1 cup peanut butter (creamy or crunchy)
1/2 cup honey
1/2 tsp vanilla extract
3 cups cereal (almost any works, either crispery or flakes or mixed)
we also added 1/2 cup chocolate chips (that melted when mixed with the rest of the ingredients)
One might also add raisins or nuts.
In a saucepan, melt and stir the peanut butter and honey together (might also work in the microwave). Remove from heat and add vanilla. Stir in the cereal (and chocolate chips if desired).
You can now either make small treats by spreading the mix on a 9x9 inch pan and allow to cool, then cut into pieces.
Or, you can make small nests by filling small amounts in muffin baking form and cool (can then be decorated with jelly beans).
Or, you do it like me, and give the whole amount into a medium size bowl and let it cool in the fridge. When half way cooled, take a wooden spoon and round the edge from the top, forming a nest. Let cool completely. Boil 2-4 eggs and place into the nest.
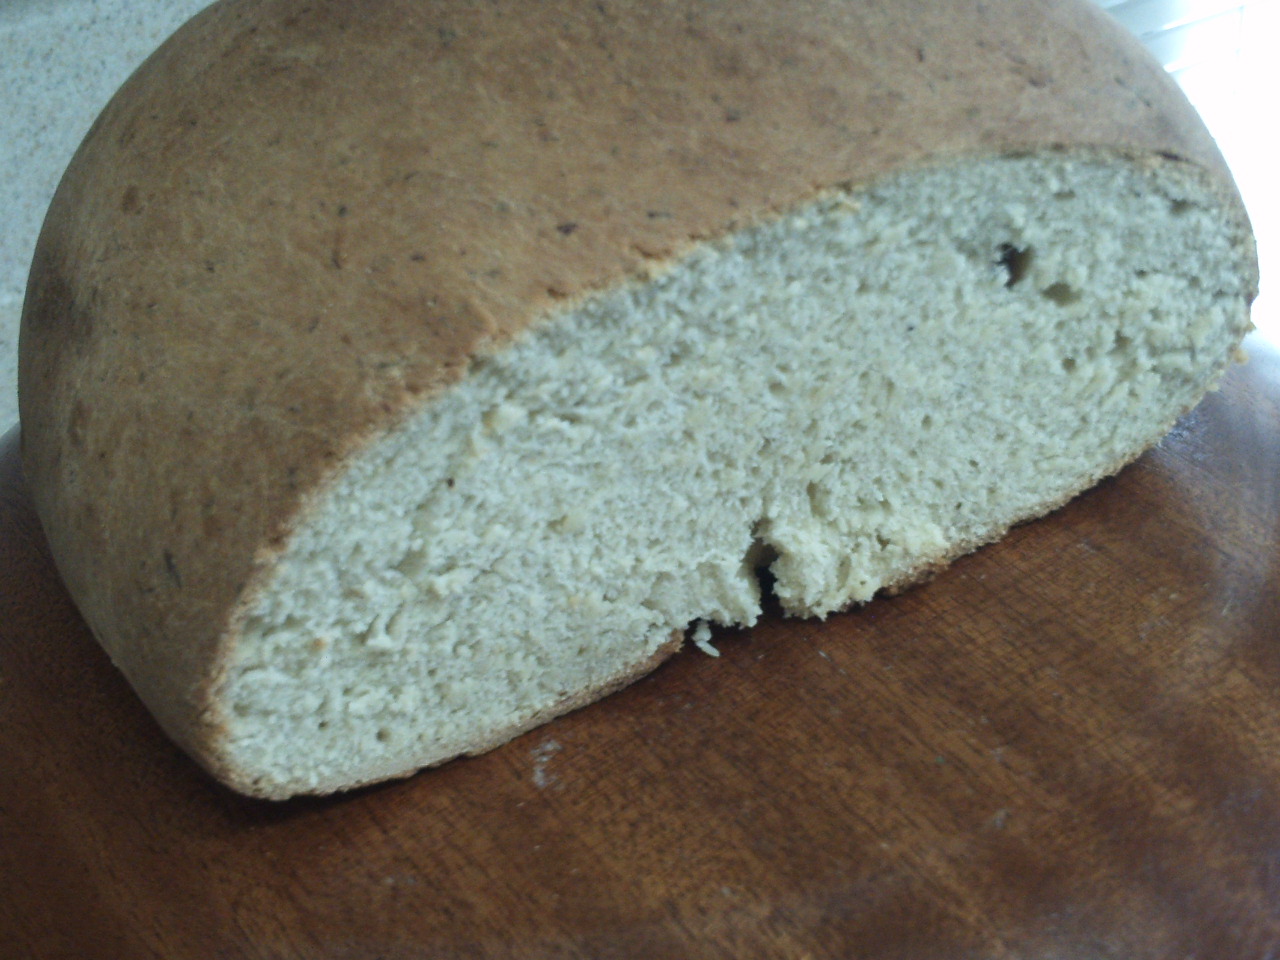
Banana bread - sweet and so yummy!
My goal is to cook and bake everything we eat myself. Since we eat about 3 breads a week, and we don't want to eat the same bread every time, I try a lot of different recipes.
Today I tried this one. It's a banana yeast bread and it tastes sooo delicious!
I love yeast! 99% of things I bake are made with yeast!
I love the smell and taste and the texture it gives to the breads and cakes!
Thank you, Lord, for yeast!!
As I said, this bread can really almost even be used as a cake substitute,
it's really gently sweet because of the bananas. And it smells awesome!
Here now the recipe:
For 2 medium sized breads (or one big bread)
(If the amount is too much for you, you can also use
half of the ingredients listed and make only 1 medium
size bread, I tried it and it came out good)
¾ cup milk
½ cup butter
½ cup granulated sugar
5 ¼ - 6 cups all purpose flour
2 tsp dry yeast
1 tsp salt
3 eggs
3 medium ripe bananas, mashed
1 tsp water

Directions:
1.
In a
saucepan cook and stir milk, butter and sugar over med. Heat until butter is
melted; cool to 120 degree F.
2.
In a
bowl combine 2 cups of flour, yeast, salt, 2 eggs, bananas and milk mixture;
beat on low until combined. Kneed or mix on med for 3 – 5 minutes, stirring
enough flour in to make a firm dough. Kneed 4-6 minutes.
3.
Place
in greased bowl, turning once to grease top. Cover and let rise until doubled
in size ( 45-90 min)
4.
Shape
1 or 2 round loaves, place on greased baking sheet; cut slits in tops. Cover,
let rise until doubled in size.
5.
Beat
remaining egg with water, brush over loaves, bake at 375 degrees for 30-35 min
or until golden brown. (You might want to have an eye on the temperature and time, this bread is a little sensitive - a large bread might need a little less heat and longer time)
Thumbprint cookies - so easy

Great and easy recipe to make with little kids
or as a homeschooling project!
You need:
·
½ cup packed brown sugar
·
¾ cup softened butter
·
½ tsp vanilla extract or bourbon vanilla
·
1 egg yolk
·
1 ½ cup flour
·
¼ tsp salt (optional)
·
Jam for filling
1.
Heat
oven to 375 degrees.
2.
In a
large bowl combine the butter, sugar, egg yolk and vanilla. Mix well.
3.
Stir
in the flour and salt (optional).
4.
Roll
into 1” balls. Place an inch apart on an ungreased cookie sheet; make little whole
in middle by pressing thumb or finger into the ball.
5.
Bake
8 – 10 minutes or until lightly browned. Remove immediately from cookie sheet.
Cool. Then fill centers with jam.
Hungarian Chocolate swirls - delicious and so easy!

How would you like some of these with your coffee in the afternoon?
Or for a weekend breakfast?
These Kakaos csigak are a typical breakfast in Hungary (that is in Europe)!
I love to cook and bake with international recipes! Learn from other
cultures, taste different foods... Whenever there is an international
event or a chance to try some food from another country or even
continent, I will be the first in line! I try everything;)
(Sometimes this has but also lead me to extended time in the restroom
the couple of days later ... but, hey, most of it was still worth it trying!)
Here now the recipe:
For the dough:
500g white (or all purpose) flour
300 ml milk
2 tsp dry yeast
50 g soft butter (buy good quality butter,
there is a huge difference in taste in the US)
there is a huge difference in taste in the US)
1 egg yolk
4 tsp sugar
1 hint of salt
to pour over the pastry later:
150 ml milk
50 g butter
For the filling:
2 tbsp Kakao (Cocoa powder)
2 tbsp powdered sugar
or try this:
1-2 tbsp Cinnamon
2tbsp sugar
or this:
4 tbsp Nutella
Directions:
Warm up the 300 ml milk and pour the dry yeast into the milk, add a hint of sugar and let stand for 15 minutes until dissolved and a little frothy.
Pour flour into a large bowl, make a well in the middle.
Into the well go: the butter, egg yolk, sugar and salt, then the yeast-milk-mix.
Mix everything to make a smooth dough. Turn on slightly floured working surface and knead for about 6 minutes. (At the beginning it may still be a little sticky, but don't add too much flour to it, especially after it is risen, the dough is much better to work with.)
Put the dough into a clean bowl and let rise in a warm place until doubled in size (or put it into the fridge and let it rise slowly over night - that way you can bake it in the morning for breakfast without having to get up in the middle of the night).
After it is risen, knock it back, let rest for 2 minutes, then knead it another 2-3 minutes. Roll it out into a rectangle shape.
Mix the powders or any other sweet filling and spread it evenly onto the dough.
From the longer side, start rolling it up and then cut it into stripes (snails) - about 10-14 pieces.
put them onto a greased baking sheet or a large greased baking form.
This is how it should look like:

Leave enough space for the snails to rise!
Then let them rise another 10-20 minutes.
Bake at 350 degree farenheit (180 Celsius) for 15 minutes.
In the meantime, get the milk and butter ready: warm them until the butter is melted.
After 15 minutes, take the pastry out of the stove and pour the milk-butter-mix evenly
over the snails. (pic below)

Put them back into the stove and bake another 15 minutes - and voila!
Enjoy !!

Pic above with Cacao/powdered sugar filling,
below with sugar/cinnamon filling
both sooo delicious!!

Valentine hearts with tinted glass in centre
Happy Valentines baking with this great recipe!
Beautiful eye catching candy-center cookies!

(also good for Mothers day or just any occasion to
share your love)
We actually did these as a homeschooling project a week before valentines day and then gave them out to our neighbors and friends.
What you need:
1 cup unsalted butter (softened)
3/4 cup sugar
1 large egg
1 tsp vanilla extract
1/3 tsp salt
2 1/2 cups flour
Hard candy for cookie center (I used Jolly Ranchers)
Making the dough:
1. Cream the butter (by beating either with a whisk by hand or using an electric mixer), gradually adding sugar. Beat in the egg until evenly mixed, then blend in the vanilla extract and salt.
2. With a wooden spoon stir the flour into the creamed ingredients, about one third at a time, until evenly blended. The dough may seem soft, but will firm up when refrigerated.
3. Divide dough in half. Flatten each portion into a disk and seal in plastic wrap. Refrigerate overnight.
Creating the cookies:
4. Heat the oven to 375 degrees. With a sheet of waxed paper on top, on a lightly floured surface, roll the dough to a 1/4 inch thickness.
5. Cut out cookies with a large cookie cutter. Remove the centers with a smaller one (We used hearts both times). Transfer the cookies and centers separated onto a lightly greased baking paper (on a baking sheet).
6. Place a hard candy in the center of each heart ...

and bake until the cookies start to brown lightly around the edges ...

and the candy is melted ...

about 8-10 minutes.

Let the cookies cool on baking sheet for 6 minutes, then transfer them to
wire racks to cool completely. Makes about 30.

Tip:
To prevent sticking, line your serving plate or tin with waxed paper and place additional waxed paper between layers.
Make your own wool dreads/ dread extensions
Ever wanted to have long hair over night?
Ever wanted to try dreads, without the commitment?
Ever wanted a hairstyle that is easy to keep up, natural
and cheap?
Here's my solution: WOOL DREADS
Here's a super easy, natural and cheap way to make your own
temporary dreads or dread extensions:
Buy wool roving in the color close to your hair color.
For the whole head you'll need at least 300g.
[You can get it on ebay or etsy for less than $10 incl. s/h.]
Cut it into pieces, about 3-4in shorter than you want to final length
(it gets longer during the following process).

Heat up some water in a large saucepan and add a little (half a pea size)
of dishwashing soap.

Put one strand at a time into the water, wait about 10-15 seconds
and take it out. Then rub the whole strand in between your hands
- from one end to the other.

There is your first dread!

This was my pile before the hot water:

One of the dreads after the hot bath and rolling:

Mama's helper on his way to hanging up the dreads in
the garage to dry ;)

Me with the dreads! (Dreads can stay in easily for 6-8 weeks)
I just folded each strand in the middle and braided it in.

To make the dreads you can plan about 2-3 hours, to braid them in,
I took about 1 hour (I braided about 35 - and I have done this before).
If this is your first time of braiding extensions in, you might want to plan more time.
I personally did not divide my hair in equal sections, if you section your hair upfront,
you will also need more time.
It might be a good idea to invite a friend or two to help you divide it and braid in the
extensions - that is lots of fun (you can put a movie on), it's much easier
and of course much faster!
Have fun! And enjoy your dreads!
The dreads can be unbraided after the 6-8 weeks and
they can be re- used!
Subscribe to:
Posts (Atom)